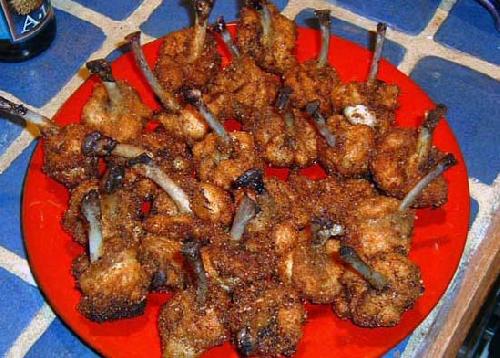
Monday, November 06, 2006


Samosa Recipe
Fried, Potato-Filled Dough Pockets

To make the samosa filling, heat in a skillet:
1 Tablespoon vegetable oil
pinch hing
1/2 teaspoon cumin/mustard/sesame seed mixture
When the seeds pop, add:
1 medium onion, finely chopped
1 Tablespoon fresh coriander leaves (cilantro), chopped
Sauté until the onion becomes translucent, then add:
1/2 Tablespoon amchur (mango) powder, or 1 Tablespoon lemon juice
1 teaspoon cumin/coriander powder
1/2 teaspoon salt
pinch hot red pepper powder
Sauté a few minutes, then add:
3 medium potatoes, boiled, peeled, and cut into very small pieces
1/4 cup frozen peas (opt.)
Mix well and sauté just until heated through, them remove from heat and set aside.
To make the samosa dough, mix in a bowl:
2 cups white flour
2 1/2 Tablespoons vegetable oil
1 1/2 Tablespoons rice flour
1/2 teaspoon salt
Add water gradually (about 1/4 cups) until the dough holds together, and knead well. Roll into a ball and cover with a moist cloth. Let rest about 20 minutes.
To assemble the samosas, break off 1 1/2"-2" pieces of the dough, and roll out into 6"-8" diameter circles. Cut each circle in half. Fold each half-circle in thirds to make a pie-wedge shape. Seal the point by pressing or pinching. Pick up the dough, and seal the outside edge by pinching to form a cone. Fill the cone two-thirds with potato mixture. Moisten the lip of the cone with a little milk or water, and pinch to seal. Press the samosa between your palms to remove air pockets. Flute the top edge and cover with a moist cloth until ready to fry.
To cook samosa, deep fry until browned, turning twice; drain. Serve with Tamarind-Date Chutney.

Saturday, November 04, 2006

Chicken Drumsticks

Chicken Drumsticks
Recipe Submitted By: Joop

Ingredients:
This is more a cutting tutorial than it is a cooking one .since this is basically just fried chicken. However, these are made using the chicken wing, not the leg, and end up looking like chicken blowpops, with a clean bone sticking out of a clump of tender chicken meat. It takes some getting used to in order to feel out the process, but I made a batch of these recently and recorded it as best I could. You also get your hands pretty slimy, but it's an impresive dish that makes for some fancy hors d'oeuvres or grill food.
All you'll need is a batch of chicken wings and a sharp chef's knife.


  • For the fried ones that I made here, you'll also need:
    - Bread Crumbs

  • - Grated Parmesan

  • - enough Oil for deep frying

  • - Milk or a few eggs.

When breading and frying, you'll want to coat the chicken in something before applying the bread crumbs, to help them stick. Some use egg whites. Some use beaten eggs. I use milk to keep it a little lighter. Up to you.
In a chicken wing, there are three sections. The big meaty side with the single humerus bone, the smaller portion with the radius and ulna bones, and the useless little wingtip.
For the first cut, you want to go into the elbow joint, though you actually want to cut into the tip of the humerus bone. You can feel the bump where the tip of the bone is. You also don't want to cut all the way through it.
Step 1:
A little deeper than the above is fine, just don't go all the way through. After that, hold the humerus side straight up and down, take the rest of the wing and pry it open further. There's a little cap on the tip of the bone that you don't want to sever.


Step 2:
The reason you don't want to sever that cap is because the meat is attached to it, rather than the bone itself. Now you want to pull that part down the humerus bone, peeling it off the bone tip. The meat will stay attached to the cap (ligament?) and peel down too. Just get it off the tip for now, so it's a little loose. If any sticks to the bone, just get in there with your fingernail. It should look like this.

Step 3:
Now cut the rest of the wing off, through what remains of the elbow joint, and set it aside.

Step 4:
This part is a little hard to explain (and to photograph, since you need two hands for this). You basically pull the meat down, and inside out, keeping it still attached to the bottem of the bone. You can make a little cut at the top of the meat, where the bone is sticking out, which will help it turn inside out. Just yank it, it takes some effort before you get the gist of what you're doing. It should look like this when you're finished:

Step 5:
That's one side finished. Now, take the other part of the chicken wing that you set aside, and you're going to do the same thing to it, but it's a tad trickier since there are two bones in there. Feel out the 'knuckle' bit at the joint, and cut into it, but not through it.

Step 6:
Pop it open with the wingtip and pull down, just like with the first part.

Step 7:
Cut the tip off. You can save them if you like to make your own chicken broth. Now you want to take out the extra bone, which will be the smaller one. Push the meat down (not inside out, yet). Hold the wing by the larger bone and gently rotate the smaller one down so that it's inline, kind of like winding a clock hand from noon to 6 o'clock. Push the smaller bone up through the meat now, you should see the tip of it. Push the bone until it sticks out, then just pull that end all the way through. Sometimes you get the little ligament cap, sometimes you don't, it doesn't really matter. You should be left with a slightly smaller version of what you had with the first part. Step 8:
Pull the meat inside-out on it the same way as before. So, one chicken wing will yield the following:
Do that a bunch more times. You get better with time. I think the first time I made these, it took me and a friend an hour to do a whole batch (how ever many come in the large wrapped packs from Safeway, maybe 20 or 30). Now I can do a whole set in 30 minutes, by myself. You'll mess up a few of them, at first. It happens.

Step 9:
From here, you can do any number of things with them. Slather them in a sauce and grill them for a BBQ, fry them as I'll show below, any way you cook bone-in chicken. As for why the fuss of doing this complicated cutting process, the end result looks really crazy, and since the meat is sort of piled at the bottem, rather than pulled taut over a bone from joint to joint, it's incredibly tender.
For the frying, set up your igredients. I use an equal mix of plain bread crumbs and grated parmesan cheese.

Step 10:
Set up a small pot with a few inches of oil to medium-high heat. You can use a fryer or deep fry thermometer if you want.
Hold your chicken by the bone (they make very useful handles for cooking and eating) and dunk it in milk (or whatever you're using) then dunk it in the bread mix, coating it well. Then put it in the oil. Repeat with enough so that you're not crowding the pot too much.
This part is a little gross, but sometimes a bit of blood from inside the bone will squirt out of the tip sticking out. Just make sure to get that bone tip into the oil for a second or two to seal it up. Once they get nice and brown, take them out.

Step 11:
The meat is very tender so over cooking it really ruins it, not to mention makes them greasy. Set them on a rack to cool.

Step 12:
You can eat them with a selection of dipping sauces or just as is, either way they are great. since I have an obsession with making really fancied up versions of normal food like grilled cheese sandwiches. They are also great cold, the next day, or any other way you like your KFC.

Tuesday, October 10, 2006

Ginger Is a Natural Digestive aid ,This cool Refreshing Drink serves as a thirst quencher as well as cure for digestion Problems


Gi ng e r L i m e S h e r b e t
Ingredients
100 gms fresh ginger
1 cup lime juice
1 cup water
2 tbsp. water
2 cups sugar
Method
Wash, peel and grind ginger to a fine paste.
Add 2 tsp. water, pass through a clean muslin cloth to extract juice.
Dissolve sugar in one cup water on low heat.
Add ginger and lime juice after sugar has dissolved.
Heat till mixture boils (approx. 5 minutes).
Remove from and heat and cool till warm.
Pour into clean sterile bottle.
Refrigerate and use as concentrate, when required.

Sunday, October 08, 2006

Spicy Indian Food .Exotic and simple indian dishes which u will love .Indian pallete tantalizers.Sweets and Side Dishes and Snacks as we make at home

Hello,
Good To see you ,I'm Starting this blog specifically for indians .When i first started cooking i didn't know ABC of cooking..Now tht i Know ABC :) I think I can share it with others who might have faced the same situation .I am adding foods recipes That i make at home so some recipes might be very mundane like Idly and some Gr8 .
U might be wondering why i chose this name of "Spicy Khana" ...It's simple tht's the only name tht went thro Blogger :)Now don't go expecting me to put in all hot n spicy food recipes !Since this is my First Blog I'll be starting it with a sweet .and I'll be adding recipes as i make them.So tht like my cousin does i can add photos to my Blog of recipes ...
For ppl who don't mind Photos and who want more recipes try my web Hot Recipes (http://members.lycos.co.uk/hotrecipes).
There u find find almost a 1000 recipes on almost all our indian food from the basic to exotic .Now I want to start my post...My
Sweet ..Hey ...
do come back for i guess there's a chance we might end up friends ,if we cook or not n let me know what u think abt the blog n if u visited the site too.
:)
Bye

Kaju Katli

Ingredients
150 grams Cashew Nut pieces
150 grams Powered Sugar1/4 tsp.
Some extra Powder Sugar for dusting
Silver foils (edible) (optional)

Preparation

Soak Cashew Nuts in water for 30 minutes.
Remove from Water and dry on a cloth for 15-20 minutes.
Add Cashews and Sugar into the Mixer and grind until smooth paste. (Note: Do not add water)
Cook the mixture in a thick bottom vessel, on slow heat and keep stirring.
Remove from heat when mixture hardens .
Divide in two equal parts and roll out into uniform thickness using rolling pin,dusting extra powdered sugar.
Paste silver foils and cut into diamond shapes.
Iyengar Rasam Powder

INGREDIENTS

Fenugreek......... 60 gms
Jeera............ .....70 gms
Black pepper...... 45 gms
Dhania .......... ...150 gms
Salem chillies.... ...75gms
Bedagi chillies.... ..75gms
Mustard........... ....15gms
Real Asafoetida....2 pinches
Curry leaves...... ..2 sprigs
Turmeric ........ ......1/2 tsp
Cooking oil............1.5 tbsp

Method Of Preparation
Take an Iron Kadai and first dry roast, Fenugreek,Jeera and Mustard.

Roast till Fenugreek becomes pinkish brown and mustard starts popping.

Remove from Kadai and let them cool.

Now add oil in Kadai and first put Black pepper.

Once black pepper starts bursting, add chillies and Dhania and Turmeric roots (Piece them before putting for frying).

Go on turning with a spatula to give equal frying.

Once chillies assume a silken shine on the surface, immediately add curry leaves.

Turn three four times and remove from kadai and immediately spread on a polythene sheet/cloth.

Once the mixture becomes cold, add Hing (Asafoetida) and powder.

Hello,I'm Ramkumari from Tamilnadu,a mom of 2 kids...u might be wondering why i chose this name of "Spicy Khana" ...It's simple tht's the only name tht went thro Blogger :)Now don't go expecting me to put in all hot n spicy food recipes !Since this is my First Blog I'll be starting it with a sweet .and I'll be adding recipes as i make them.So tht like my cousin does i can add photos to my Blog of recipes ...For ppl who don't mind Photos and who want more recipes try my web http://members.lycos.co.uk/hotrecipes .There u find find almost a 1000 recipes on almost all our indian food from the basic to exotic .Now I want to start my first post...
A Sweet ..Hey ...do come back for i guess there's a chance we might end up friends ,if we cook or not n let me know what u think abt the blog n if u visited the site too.:)


Kaju Katli
Ingredients
150 grams Cashew Nut pieces
150 grams Powered Sugar1/4 tsp.
Some extra Powder Sugar for dusting
Silver foils (edible) (optional)

Preparation

Soak Cashew Nuts in water for 30 minutes.
Remove from Water and dry on a cloth for 15-20 minutes.
Add Cashews and Sugar into the Mixer and grind until smooth paste. (Note: Do not add water)
Cook the mixture in a thick bottom vessel, on slow heat and keep stirring.
Remove from heat when mixture hardens .
Divide in two equal parts and roll out into uniform thickness using rolling pin,dusting extra powdered sugar.
Paste silver foils and cut into diamond shapes.